As a user, mastering the correct way to use a polish machine is crucial for improving work efficiency and product quality. Today, I will share in detail how to use a polishing machine based on my own experience.
I. Inspection and Cleaning of the Polishing Equipments
Before the first use or every time you turn on the machine, inspecting the equipment is an essential step. Check if the polish machine is in good condition, including the operation console and the power supply part. Examine the transmission mechanism of the equipment to see if there is any jamming, and check whether the screws at the connection parts are tightened. For the power supply part, focus on checking if the power cord is damaged, if there is any exposed wire, whether the switch can open and close properly, and if the wiring terminals are secure.
The cleanliness of the polishing tank is directly related to the polishing effect. If there is any residual polishing liquid, impurities, or dirt left in the polishing tank from before, it may contaminate the newly prepared polishing liquid and affect the polishing quality. Use a polishing cloth to wipe the polishing tank thoroughly to ensure that there is no residual substance inside, creating good conditions for the subsequent polishing work.
II. Preparation of the Polishing Liquid
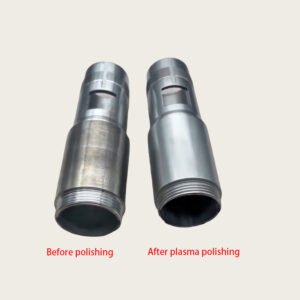
Add tap water to the reaction tank of the polishing machine and heat it to about 90°C. Turn on the air agitation, and then add the polishing salt to make the polishing salt dissolve fully. After adding it, use a flashlight to check the bottom of the tank to confirm that all the polishing salt has melted. If it has not completely melted, repeat the above steps. Our polishing machine is suitable for various metal materials such as stainless steel, copper alloy, and aluminum alloy. Before use, you need to confirm the material of the workpiece and select the dedicated polishing liquid that matches it.
| Material Type | Recommended Concentration of Polishing Liquid | Process Characteristics |
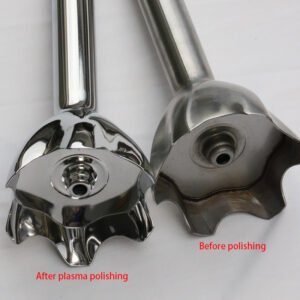
| Stainless Steel (304/316L) | 4% | The mirror precision can reach 0.002mm. Control the temperature between 90–100°C to avoid ablation of sharp parts. |
| Copper and Copper Alloy | 4% | Quickly remove the oxide layer. Suitable for polishing electronic connectors and decorative parts. |
| Zinc Alloy | 4%–5% | Pay attention to the upper limit of the concentration to prevent surface over-corrosion. Suitable for automotive parts and bathroom products. |
| Aluminum Alloy | 3.5%–4.5% | The concentration should be slightly lower than that for stainless steel to prevent excessive dissolution. Suitable for lightweight components in aerospace. |
| Titanium Alloy | 4%–5% | Needs to be used with a high-frequency pulse power supply to improve the surface fatigue resistance. Commonly used for medical implants. |
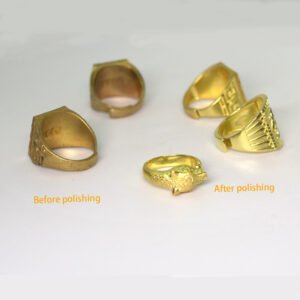
| Gold and Silver | 2%–3% | A low concentration reduces the loss of precious metals. The waste liquid can be recycled and refined. Suitable for jewelry and precision electronic contacts. |
Note: 4% is the general reference concentration, and it needs to be adjusted slightly according to the shape of the workpiece, its surface condition, and the processing target. A too high concentration will increase the cost of the polishing salt and may reduce the polishing quality. Avoid adjusting it blindly.

III. Pre-treatment Before Polishing
1. Selection of Hanging Position: For jewelry products, choose an appropriate hanging point. Try to choose a position that has little impact on the polishing effect of the jewelry and has low requirements. If you really can’t find one, you can choose a position that is easy to deal with to avoid affecting the product quality.
2. Hanging the Workpiece: Hang the processed product on the hanger and fasten it tightly so that it doesn’t loosen.
3. Placing in the Polishing Machine: Lock the hanger with the products on it onto the hanger of the plasma polishing machine.
IV. Setting of the Parameters of the Polishing Equipment
According to the material, shape, size of the workpiece, and the required polishing effect, set appropriate power and polishing time on the operation panel of the equipment. Generally speaking, workpieces with harder materials and larger surface roughness require higher power and longer polishing time; while workpieces with softer materials and lower surface requirements can appropriately reduce the power and shorten the time. For example, for stainless steel workpieces, the power can be set between 500 – 800W, and the polishing time is 5 – 15 minutes; for aluminum alloy workpieces, the power can be set between 300 – 500W, and the polishing time is 3 – 10 minutes.
V. Starting the Equipment and Beginning the Polishing
1. After confirming that all parameters are set, press the start button of the equipment. At this time, the motor of the equipment starts to run, and the plasma generator starts to work, generating plasma.
2. When the equipment is running stably, open the cover of the polishing tank and slowly put the fixture with the fixed workpiece into the polishing tank. Ensure that the workpiece is completely immersed in the polishing liquid and maintains an appropriate distance from the electrode. Close the cover of the polishing tank to prevent the plasma from escaping and the polishing liquid from splashing. The equipment door will open automatically after the polishing is completed.
3. During the polishing process, always pay attention to the running condition of the equipment and the polishing state of the workpiece. Observe the instruments such as the ammeter and voltmeter of the equipment to ensure that the running parameters of the equipment are stable within the set range. At the same time, you can observe the polishing situation of the workpiece surface through the observation window of the equipment or other auxiliary devices, such as whether there are bubbles generated and changes in surface glossiness. If any abnormal situation is found, such as abnormal running sounds of the equipment, excessive corrosion or uneven polishing on the workpiece surface, stop the equipment operation immediately and conduct inspection and adjustment.
4. After the polishing is completed, take out the hanger and rinse the products in the water tank to remove the residual polishing liquid on the surface.

VI. Cleaning and Maintenance of the Polishing Equipment
1. Drain the polishing liquid in the polishing tank into the designated recycling container for subsequent treatment or reuse. Thoroughly clean the polishing tank with clean water to remove the dirt and impurities remaining on the tank wall and the bottom. You can use tools such as a brush and a cleaning agent for cleaning to ensure that the polishing tank is clean and tidy.
2. Check the wear condition of the electrode. If there is obvious corrosion or deformation on the surface of the electrode, a new electrode needs to be replaced in a timely manner. At the same time, check other components of the equipment, such as the air pipe, connectors, motor, etc., to see if there is any damage or looseness. If there are any problems, repair or replace them in a timely manner.
3. Wipe the surface of the equipment with a clean cloth to remove dust and stains. For parts such as the operation panel and the display screen of the equipment, be especially careful and avoid using cleaning agents containing corrosives to prevent damaging the equipment.
4. To ensure the long-term stable operation of the equipment, regular maintenance of the equipment is required. According to the requirements of the equipment instruction manual, lubricate the motor, transmission system and other components of the equipment regularly; check the electrical connections and airtightness of the air circuit of the equipment regularly; calibrate and debug the equipment regularly to ensure that the performance of the equipment is always in the best state.
Finally, using a metal polishing machine correctly requires making full preparations before use, setting parameters and running the equipment strictly according to the steps during the operation process, and properly handling and maintaining the workpiece and the equipment after use. Only in this way can we give full play to the performance of the equipment, obtain the desired polishing effect, and at the same time extend the service life of the equipment. I hope the above content can help you use the metal polishing machine better and bring convenience and high efficiency to your production and processing.